Cluster Autoscaler 2 – PaaS Compute Options
- Home Certification of Microsoft AZ-104
- Cluster Autoscaler 2 – PaaS Compute Options


Cluster Autoscaler 2 – PaaS Compute Options
Primary Node Pool
- Node size: This is the size of the node; the default choice is Standard DS2_v2. If you want, you can select any available VM sizes.
- Scale method: Here the options are Manual and Autoscaling. The default option is Autoscale, and you will see the node code range to specify the minimum and maximum number of nodes. However, we will go with the Manual scaling option.
- Node count: Since you selected Manual, you get to choose the node count. The default value is 3.
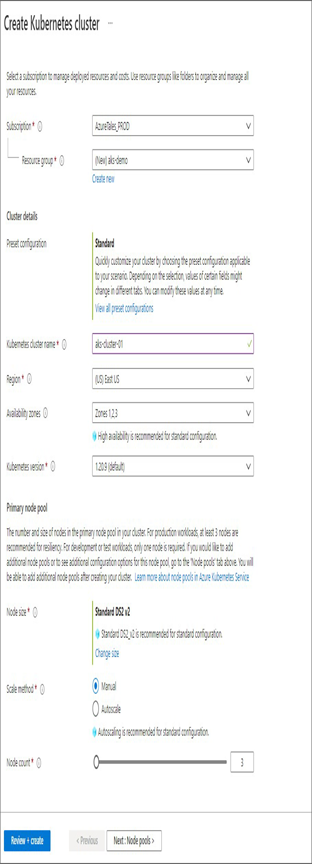
- You don’t need to make any configuration changes on the remaining tabs. You can click Review + Create to start the validation. Once the validation is done, click Create to create the cluster. The process may take some time to deploy, so you can sit back and relax.
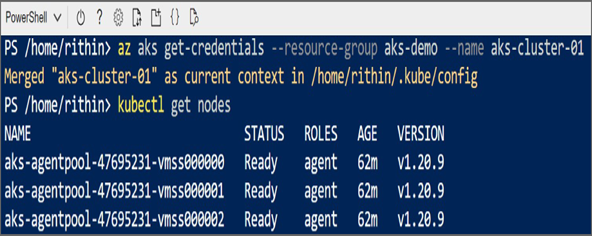
- Once the cluster is created, launch a cloud shell console, and let’s connect to the cluster using the command az aks get-credentials –resource-group –name . Here’s an example: az aks get-credentials –resource-group aks-demo –name aks-cluster-01. This command will download the context and save it in your home directory.
- Check the number of nodes using the command kubectl get nodes. Since you created a three-node cluster, you should be able to see three nodes.
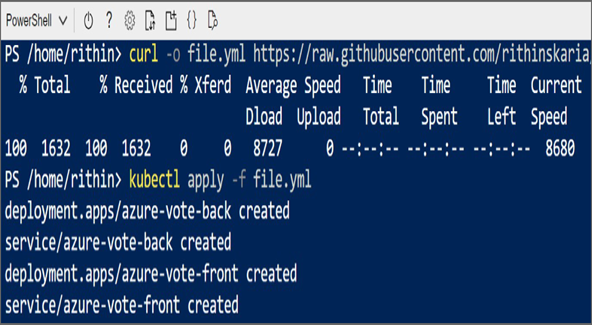
- You need to download the YAML file from the GitHub repository. For that, run curl -o file.yml https://raw.githubusercontent.com/rithinskaria/azure-infra/main/aks-demo.yml; this command will download the YAML file from the GitHub and save it as file.yml.
- Use the file.yml file to deploy the components. If you inspect the file, you can see that it contains two Deployment components, ClusterIP, and a LoadBalancer. Deploy the application using kubectl apply -f file.yml.
- In the terminal, you will see the list of components deployed.
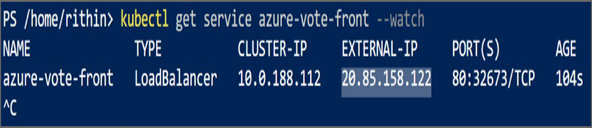
10. Now you need to find the IP address of the load balancer using the command kubectl get service azure-vote-front –watch. The –watch parameter will keep the command running, and you can stop it by pressing Ctrl+C once you see the external IP address. Copy the external IP address.
11. Open a browser and paste the external IP address of the load balancer. You will be able to see the application running. You can start voting and reset the value if needed.
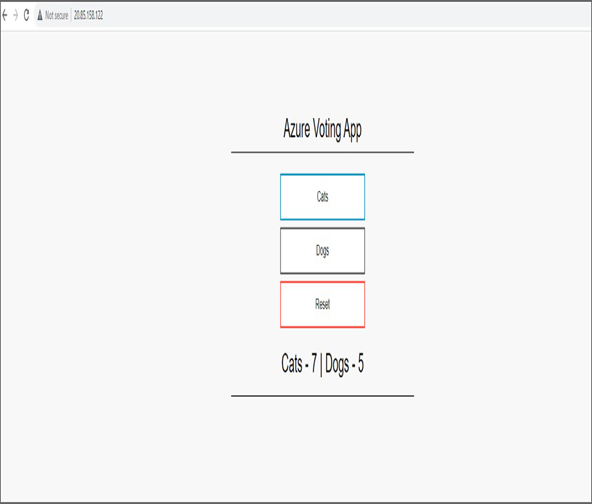
Now our application is containerized and is running in an AKS cluster. You are accessing the application externally using the IP address of Azure Load Balancer.
Summary
This chapter explored different PaaS compute options available to you. You started the chapter with Azure App Services, which is a solution that offers a hosting environment for deploying web applications, mobile backends, and restful APIs. There are multiple tiers available for Azure App Service plans based on the requirements and type of workload you are running. Also, we covered the scaling options available for App Service plans. Later, you saw how you can deploy Azure App Services to these plans and leverage features such as continuous deployment, deployment slots, authentication, custom domains, and backup.
After completing App Services, we covered container instances. Azure Container Instances offers the easiest way to deploy containerized applications in Azure. In the exercise, you created a customized nginx image from scratch, pushed it to Azure Container Registry, and deployed the image to Azure Container Instances. Since ACI offers public IP connectivity, you verified the connectivity to your nginx container from the browser.
When you are handling containers at scale, Azure Container Instances might not be the right solution, and you need container orchestrators. Azure offers the Azure Kubernetes Service, which provides a managed platform for container orchestration. As this is a managed cluster, all cluster management and control plane maintenance and configuration are managed by Azure. Though the intention of this book is not to teach Kubernetes, still we covered core concepts related to AKS such as cluster components, networking, storage, upgrades, and scaling.
In Chapter 10, “Data Protection,” we will cover backup and recovery. The goal of the next chapter is to familiarize yourself with the Azure Backup solution and Azure Site Recovery, which is a disaster recovery solution.